Turn one photo into a comic panel: black ink line on top, flat color underneath, paper on top of that. This is Treatment B in the Design Bible, and it is the only legal way to put a converted photo in the book.
Tool: Photoshop. Time: about 45 minutes the first time, 15 once you have done three. Posts to: #design, as a Google Drive link to the layered PSD plus a flattened JPG, tagged with your name and the look you used.
Bounty: 100 DK when every line of the checklist at the bottom is in. Dojo-kun pays it when Sensei or your chair marks it done. Repeat it on a new photo and a different look for a second 100.
Nobody in the room should be the person who only knows one click.
Be the person the room sends their photo to.
What a complete project looks like
☐ Collapsed. Expand brings it back, and it stays how you leave it on this device.
Hold your file up against this picture. Whatever is missing is your note.
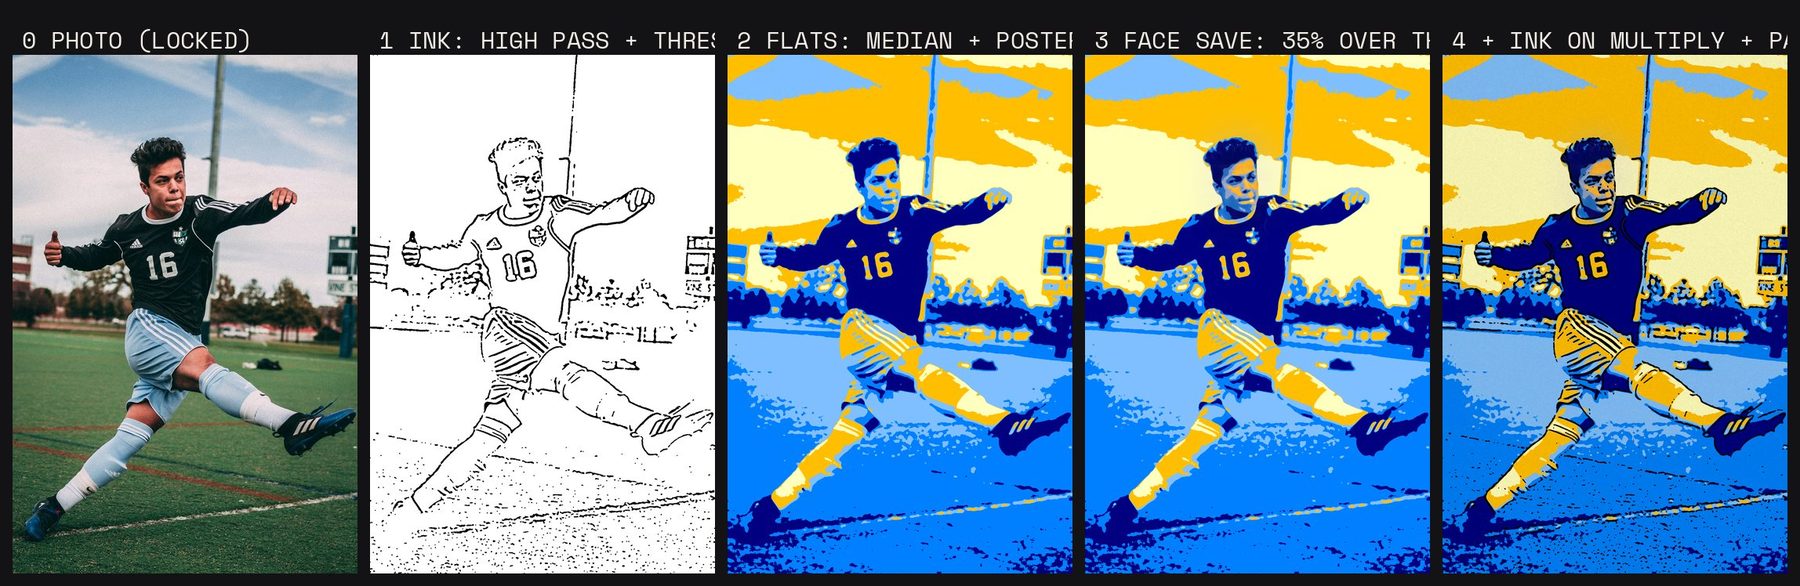
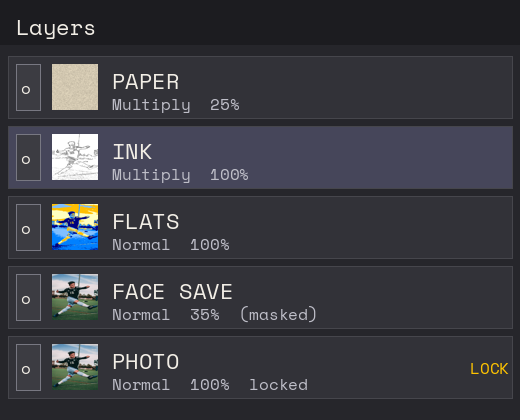
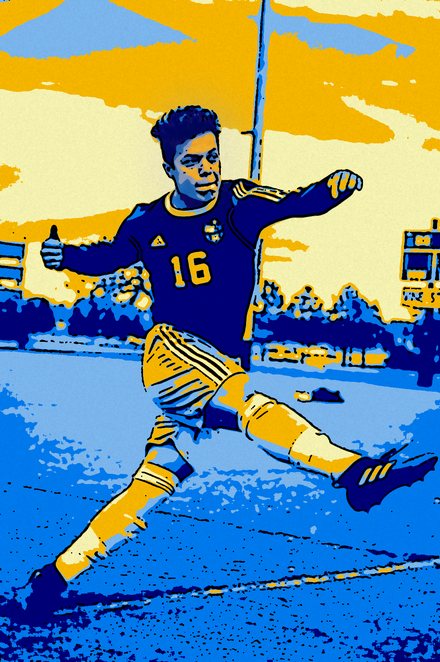
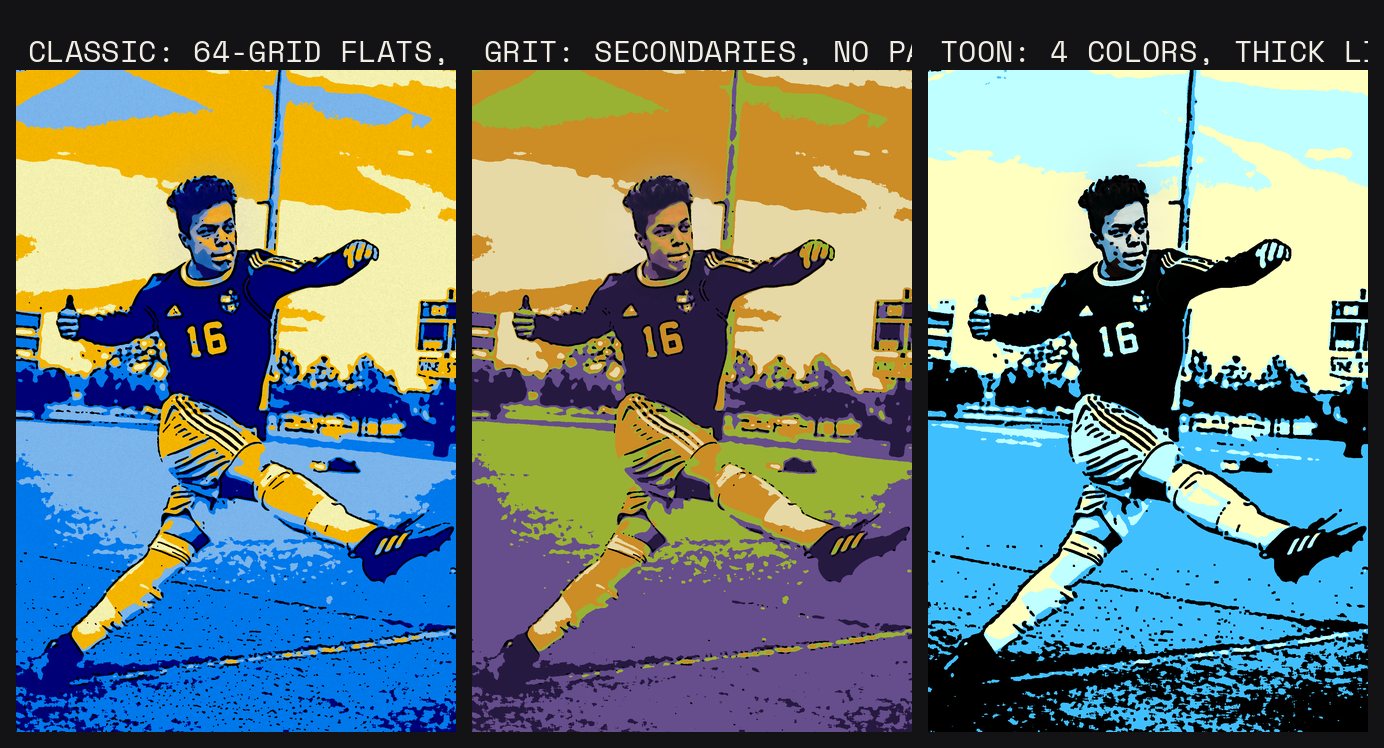
You open the finished PSD and the Layers panel shows five layers, top to bottom, each named exactly like this: PAPER, INK, FLATS, FACE SAVE, PHOTO. Nothing is named “Layer 3 copy.”
PHOTO is the original, untouched, locked, at the bottom. If someone turns every other layer off, the plain photo is still there.
FLATS is the photo turned into flat color: five to seven colors, hard edges between them, no smooth ramps anywhere. A jersey is one red. The sky is one blue. A face is two or three steps of one skin tone, not a photo-real face. The colors are the spread’s palette, so a CLASSIC job sits on the 25/50/100 grid and a GRIT job is secondaries.
INK sits on top, set to Multiply, and it is black and white only: black lines where the photo had edges, white (which disappears) everywhere else. The lines are heavy and a little rough, like a brush, not a thin even outline like a coloring book. There are no specks of black floating in flat areas, because you cleaned them.
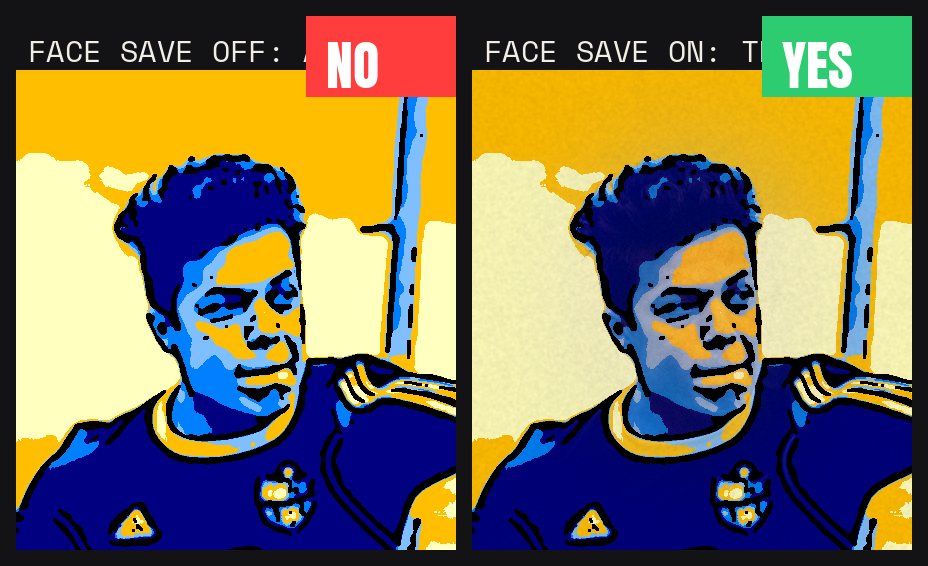
FACE SAVE is a masked copy of the photo sitting between FLATS and INK, at 30 to 40 percent opacity, visible only over the faces. Turn it off and the face goes flat and loses the person. Turn it on and you can tell exactly who it is. That is the whole point of the layer.
PAPER is a newsprint texture on top at Multiply, 20 to 30 percent. On a GRIT or TOON job this layer is turned off, not deleted.
The image is at print size at 300 dpi. Image > Image Size says so. It was not blown up from a phone screenshot.
The flattened JPG next to the PSD looks like a panel out of a comic, and the person in it is recognizable from across the room.
And the first thing anyone says when they see it is the student’s name, not “cool filter.”
Setup
☐ Collapsed. Expand brings it back, and it stays how you leave it on this device.
Pick a photo and set up the file. Five minutes.
1. Pick a photo from the PHOTO DRIVE with one clear subject, good light, and a plain background. Side light beats flat light: the conversion needs shadows to find edges. A dark gym photo with four people in it will fight you the whole way. Ignore it. Pick an easy one for your first job.
2. Open it in Photoshop. Image > Image Size. Uncheck Resample. Set Resolution to 300. Read the Width. If it is under 5 inches, pick a different photo. Ignore the Fit To dropdown.
3. Image > Mode > RGB Color, 8 bits, for the build. CMYK happens when the spread is built, not here.
4. Rename the Background layer PHOTO (double-click the name). Lock it (the padlock in the Layers panel). You never touch this layer again.
5. File > Save As. Photoshop format. Name it LASTNAME_INKFLATS_LOOK_V1.psd, so GARCIA_INKFLATS_CLASSIC_V1.psd. Save it into your own folder in the PHOTO DRIVE.
Step 1: INK
☐ Collapsed. Expand brings it back, and it stays how you leave it on this device.
Make the black line layer first. It tells you right away whether the photo is going to work.
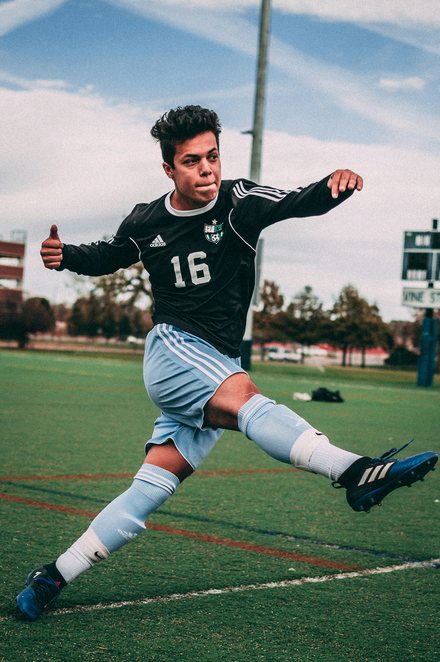
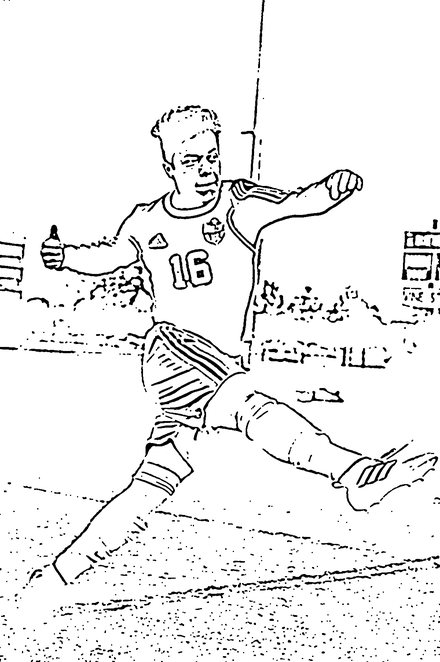
1. Duplicate PHOTO (Ctrl+J). Rename the copy INK. Unlock it if the lock came along.
2. Image > Adjustments > Desaturate (Shift+Ctrl+U). It goes grey.
2b. Filter > Blur > Gaussian Blur, 1 px. This kills grass, turf and fabric texture so they do not turn into speckles. Do not skip it on a sports photo.
3. Filter > Other > High Pass. Radius 3 to 6 px. The picture turns mostly flat grey with the edges showing. Bigger radius means thicker, rougher lines. Start at 4.
4. Image > Adjustments > Threshold. Drag the slider until the edges are solid black and the flat areas are clean white. Usually somewhere between 110 and 135. There is no right number. Stop when it looks like somebody inked it.
5. Set the layer’s blend mode (the dropdown that says Normal at the top of the Layers panel) to Multiply. The white disappears and the black lines sit on the photo.
6. Clean up. Pick the Brush, color white, hardness 100%, and paint out stray specks in flat areas (skin, sky, walls). Pick black and thicken any outline that broke. Spend five real minutes here. This is the step that separates a comic from a filter.
Ignore: Filter Gallery, Poster Edges, Find Edges, any action called “comic.” They give you grey mush and a thin even line, which is the coloring-book look we are not doing.
Step 2: FLATS
☐ Collapsed. Expand brings it back, and it stays how you leave it on this device.
Now the flat color underneath.
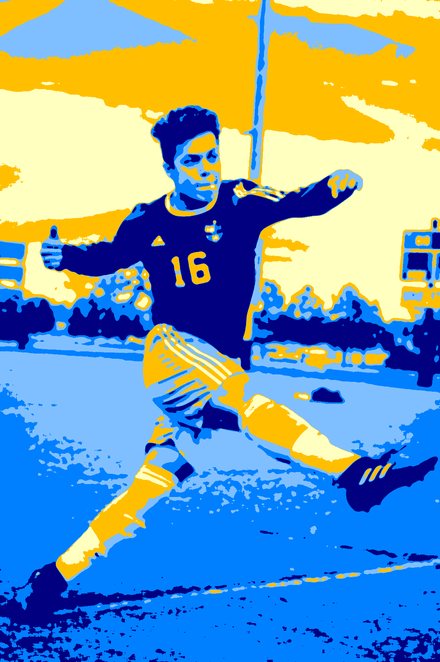
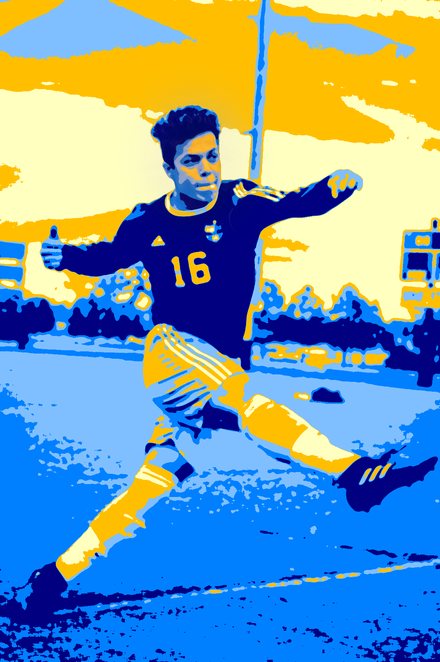
1. Click PHOTO, duplicate it (Ctrl+J), rename the copy FLATS, and drag it so it sits above PHOTO and below INK.
2. Filter > Noise > Median, radius 4 to 8 px. This melts the small texture (pores, grass, fabric) so the colors come out in clean shapes instead of confetti. Do not skip it.
3. Image > Adjustments > Posterize. Levels 4 to 6. Lower is flatter and more comic. Start at 5.
4. Now put the palette on it. Layer > New Adjustment Layer > Gradient Map, and check Use Previous Layer to Create Clipping Mask so it only affects FLATS. Click the gradient, and build it from the spread’s palette: 5 to 7 color stops, and for each stop drag its left and right neighbors together so the change between colors is a hard step, not a smooth ramp. Darkest color on the left, lightest on the right.
CLASSIC: grid colors, team color as the hero, a warm cream for the light end.
GRIT: deep purple, olive, mustard, dirty orange, one near-black.
TOON: two values per object. Fewer stops. Start at 4.
5. Zoom to 25%. If the subject is still a readable shape in flat color, you are done. If it turned into soup, go back to Posterize and drop one level, or raise Median by 2.
Step 3: FACE SAVE
☐ Collapsed. Expand brings it back, and it stays how you leave it on this device.
A yearbook where you cannot tell who someone is has failed, whatever it looks like. This layer is the fix.
1. Click PHOTO, duplicate it (Ctrl+J), rename the copy FACE SAVE, and drag it above FLATS (and above the Gradient Map) but below INK.
2. With FACE SAVE selected, hold Alt and click the Add Layer Mask button at the bottom of the Layers panel. The whole layer hides.
3. Brush, white, soft edge (hardness 0 to 20%), size about the width of a face. Paint over each face. The real photo comes back only where you paint.
4. Set the layer Opacity to 30 to 40%. The face now reads as a person without turning back into a photo.
Check: turn FACE SAVE off and on. Off: flat and anonymous. On: that is clearly them. If on and off look the same, your mask missed the face.
Step 4: PAPER
☐ Collapsed. Expand brings it back, and it stays how you leave it on this device.
CLASSIC only. GRIT and TOON skip this step but keep the layer, turned off.
1. Drop the newsprint texture from the PHOTO DRIVE (Design Bible assets folder) onto the file. File > Place Embedded. Scale it to cover the image, press Enter. Rename it PAPER, drag it to the top of the stack.
2. Blend mode Multiply. Opacity 20 to 30%.
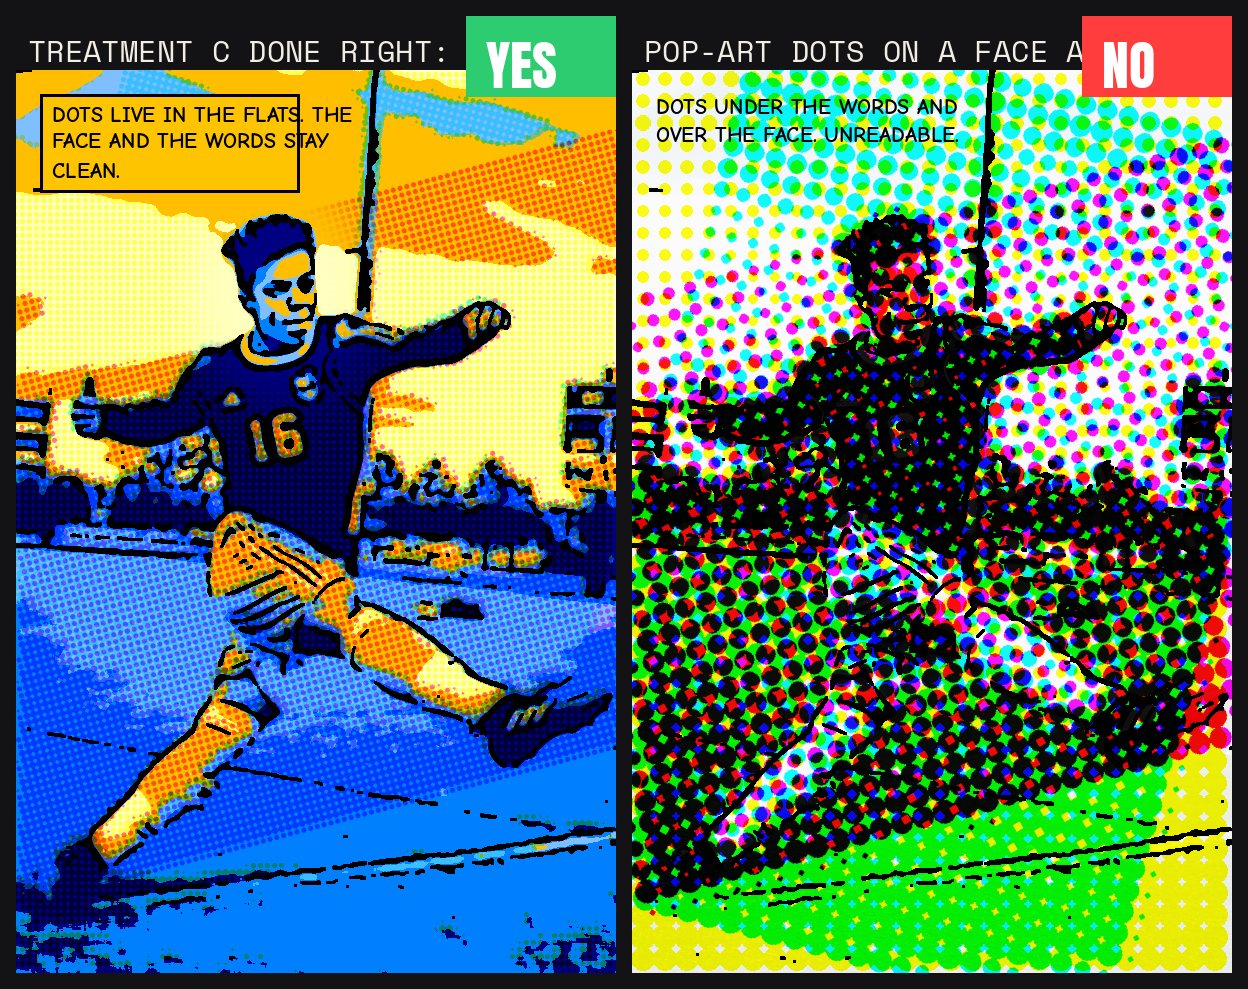
3. Optional, CLASSIC only, and only on the color fields: duplicate FLATS, Filter > Pixelate > Color Halftone, Max Radius 4 to 6 px, set to Multiply at 40 to 60%, then mask it off every face. This is Treatment C riding on top of Treatment B. If you are not sure, skip it.
Ignore: every other texture in the folder. One paper. Twenty percent. Done.
Step 5: Save, flatten, post
☐ Collapsed. Expand brings it back, and it stays how you leave it on this device.
Two files go up: the layered PSD and a flat JPG.
1. Check your Layers panel against the picture in section 01. Five named layers in the right order. Fix names now.
2. Ctrl+S. The PSD is your master. It never gets flattened.
3. File > Export > Export As. JPG, quality 80, same name as the PSD with .jpg. Save it next to the PSD.
4. Post in #design: the Google Drive link to the folder with both files, your name, and the look you used. Example: GARCIA_INKFLATS_CLASSIC_V1 | CLASSIC | link.
5. Tag your chair. They run the checklist. Done means the bounty pays.
The one mistake
☐ Collapsed. Expand brings it back, and it stays how you leave it on this device.
Running the conversion on the whole photo and calling it done.
A posterized face with no FACE SAVE is a stranger. A line layer with no cleanup is a filter. A gradient map with smooth ramps is a 1996 screensaver. All three happen when you do steps 1 through 4 in six minutes and never zoom in.
The tools take five minutes.
The eye takes the other forty.
The checklist
☐ Collapsed. Expand brings it back, and it stays how you leave it on this device.
Build work, so every line is in or out. All in, 100 DK. One out, it comes back with a note.
☐ Five layers, named exactly: PAPER, INK, FLATS, FACE SAVE, PHOTO, in that order.
☐ PHOTO is untouched and locked. Turn everything else off and the plain photo is there.
☐ 300 dpi at print size. Image Size says 300 and the width is 5 in or more without resampling.
☐ INK is black and white only, set to Multiply, with no stray specks in flat areas and no broken outlines on the subject.
☐ FLATS has 5 to 7 hard-edged colors from the spread’s palette. No smooth gradients anywhere. The look is named and the palette matches it.
☐ FACE SAVE exists, is masked to the faces, and sits at 30 to 40%. Toggling it visibly changes the face.
☐ Every person is recognizable from arm’s length.
☐ PAPER is on at 20 to 30% for CLASSIC, present but off for GRIT and TOON.
☐ No banned moves: no Poster Edges, no one-click action, no dots on a face, no glow, no blur.
☐ Posted in #design as a Drive link to the PSD and JPG, named LASTNAME_INKFLATS_LOOK_V1, chair tagged.
Ten boxes.
Tick all ten and the next photo the room cannot figure out comes to you.